Apple Pay
Collect payments from Apple wallets
Apple Pay enables secure, frictionless payments in your application, allowing customers to complete transactions directly from their Apple devices. This integration supports global collections and offers a native, seamless checkout experience.
Requirements
Feature Availability
Apple Pay is only available to customers with active Apple Pay wallets. Refer to the official list of supported countries and regions to confirm availability.
Before integrating Apple Pay, ensure the following:
- Your Flutterwave account is live.
- You have access to your API keys from the Flutterwave dashboard.
- The
Apple Payoption is enabled under your list of active payment methods on the dashboard. - You’re using a Safari browser, as Apple Pay only works on Safari.
How Apple Pay Works
When a customer adds a card to Apple Pay, Apple securely tokenizes and stores the card details in the customer’s wallet. During a transaction, Apple Pay generates a unique Device Account Number and a one-time dynamic security code. These credentials authorize the payment without sharing actual card details with the merchant.
Once authorized, Apple Pay processes the charge on the customer’s card, and Flutterwave sends a payment confirmation to your system.
Payment Flow
To accept Apple Pay payments, follow these steps:
- Initiate the transaction by collecting the customer’s details, including
amount,currency, and a unique transactionreference. - Redirect the customer to the Apple Pay modal to authorize the payment.
- Verify the transaction by checking the
status,amount,customer_idandtransaction_idbefore providing the value to the customer.
Initiating Apple Pay Transactions with Flutterwave
Integration Method
This guide follows the general integration flow. Please refer to the orchestrator flow for the alternative integration method.
Step 1: Create a Customer
To create a new customer, send a request to the create customer endpoint with relevant fields such as name, email, phone, and address.
While only the email field is required, we recommend collecting as much customer information as possible to support robust transaction records and future payments.
To retrieve existing customer details, use the retrieve customer endpoint. This is useful when initiating payments for returning users.
curl --request POST \
--url 'https://developersandbox-api.flutterwave.com/customers' \
--header 'Authorization: Bearer {{YOUR_ACCESS_TOKEN}}' \
--header 'Content-Type: application/json' \
--header 'X-Trace-Id: {{YOUR_UNIQUE_TRACE_ID}}' \
--header 'X-Idempotency-Key: {{YOUR_UNIQUE_INDEMPOTENCY_KEY}}' \
--data '{
   "address":{
      "city":"Shirley",
      "country":"US",
      "line1":"175 E Parkview Dr",
      "postal_code":"11967",
      "state":"New York"
   },
   "name":{
      "first":"John",
      "middle":"Agba",
      "last":"Doe"
   },
   "phone":{
      "country_code":"1",
      "number":"6313958745"
   },
   "email":"[email protected]"
}
'
You'll get a response similar to this:
{
    "status": "success",
    "message": "Customer created",
    "data": {
        "id": "cus_IpH7CKCUtD",
        "address": {
            "city": "Shirley",
            "country": "US",
            "line1": "175 E Parkview Dr",
            "postal_code": "11967",
            "state": "New York"
        },
        "email": "[email protected]",
        "name": {
            "first": "John",
            "middle": "Agba",
            "last": "Doe"
        },
        "phone": {
            "country_code": "1",
            "number": "6313958745"
        },
        "meta": {},
        "created_datetime": "2025-01-24T13:51:48.758121209Z"
    }
}
Step 2: Create an Apple Pay Payment Method
To create an Apple Pay payment method, send a request to the create payment method endpoint. In your request, set the type to applepay and include the applepay object with the card_holder_name field.
curl --request POST \
--url 'https://developersandbox-api.flutterwave.com/payment-methods' \
--header 'Authorization: Bearer {{YOUR_ACCESS_TOKEN}}' \
--header 'Content-Type: application/json' \
--header 'X-Trace-Id: {{YOUR_UNIQUE_TRACE_ID}}' \
--header 'X-Idempotency-Key: {{YOUR_UNIQUE_INDEMPOTENCY_KEY}}' \
--data '{
  "type": "applepay",
  "applepay": {
    "card_holder_name": "John Doe"
  }
}'
You'll get a response similar to this:
{
    "status": "success",
    "message": "Payment method created",
    "data": {
        "type": "applepay",
        "applepay": {
            "card_holder_name": "John Doe"
        },
        "id": "pmd_o4A5IuZkTn",
        "meta": {},
        "created_datetime": "2025-01-24T14:06:42.041965876Z"
    }
}
Step 3: Create the Charge
To initiate an Apple Pay charge, send a request to the create charge endpoint with the following parameters:
customer_id: The ID returned from Step 1 (customer creation).payment_method_id: The ID returned from Step 2 (payment method creation).- Transaction details including:
amount,currency, and a uniquereferencefor the transaction.
curl --request POST \
--url 'https://developersandbox-api.flutterwave.com/charges' \
--header 'Authorization: Bearer {{YOUR_ACCESS_TOKEN}}' \
--header 'Content-Type: application/json' \
--header 'X-Trace-Id: {{YOUR_UNIQUE_TRACE_ID}}' \
--header 'X-Idempotency-Key: {{YOUR_UNIQUE_INDEMPOTENCY_KEY}}' \
--data '{
   "reference": "cedfa85a-a803-4a06-a586-0f81fb9b9f22",
   "currency": "USD",
   "customer_id": "cus_IpH7CKCUtD",
   "payment_method_id": "pmd_058VyomRI6",
   "redirect_url":"https://google.com",
   "amount": 250,
   "meta":{
     "person_name": "Abraham Olaobju",
     "role": "Developer"
   }
 }
'
You'll get a response similar to this:
{
    "status": "success",
    "message": "Charge created",
    "data": {
        "id": "chg_lGNRwn3Wtl",
        "amount": 250,
        "fees": [
            {
                "type": "vat",
                "amount": 0
            },
            {
                "type": "app",
                "amount": 0
            },
            {
                "type": "merchant",
                "amount": 0
            },
            {
                "type": "stamp_duty",
                "amount": 0
            }
        ],
        "currency": "USD",
        "customer_id": "cus_IpH7CKCUtD",
        "settled": false,
        "settlement_id": [],
        "meta": {
            "person_name": "Abraham Olaobju",
            "role": "Developer"
        },
        "next_action": {
            "type": "redirect_url",
            "redirect_url": {
                "url": "https://developer-sandbox-ui-sit.flutterwave.cloud/redirects?card&token=eyJhbGciOiJIUzI1NiJ9.eyJjbGllbnRJZCI6ImFkYjVlYzZjLTBiOWMtNGViNC05YTM1LTNiM2RlZGNjNTdmNiIsImNoYXJnZUlkIjoiY2hnX2xHTlJ3bjNXdGwiLCJzdWIiOiJhZGI1ZWM2Yy0wYjljLTRlYjQtOWEzNS0zYjNkZWRjYzU3ZjYiLCJpYXQiOjE3Mzc3MDEzMjgsImV4cCI6MTczNzcwMTYyOH0.mKMORogVSa017dflgS5XMCrVtTINqRZZoZd6wk5VlxQ"
            }
        },
        "payment_method_details": {
            "type": "applepay",
            "applepay": {
                "card_holder_name": "Abraham Jesulayomi Olaobaju"
            },
            "id": "pmd_058VyomRI6",
            "customer_id": "cus_IpH7CKCUtD",
            "meta": {},
            "created_datetime": "2025-01-24T06:26:24.855Z"
        },
        "redirect_url": "https://google.com",
        "reference": "bfac7787-1653-484b-bb1f-02ee0451c968",
        "status": "pending",
        "processor_response": {
            "type": "pending",
            "code": "02"
        },
        "created_datetime": "2025-01-24T06:48:48.813188684Z"
    }
}
Step 4: Authorising the Payment
After you initiate the charge, the response object may contain "data.status": "pending", indicating the customer has not yet authorized the payment.
To proceed:
- Redirect the customer to the URL provided in the
data.next_action.redirect_urlfield. - Wait for completion. Once the customer authorizes the payment, Flutterwave processes the charge.
{
   "status":"success",
   "message":"Charge created",
   "data":{
      "id":"chg_mJmG75fe0b",
      "amount":200,
      "fees":[
         {
            "type":"vat",
            "amount":0
         },
         {
            "type":"app",
            "amount":0
         },
         {
            "type":"merchant",
            "amount":0
         },
         {
            "type":"stamp_duty",
            "amount":0
         }
      ],
      "currency":"USD",
      "customer_id":"cus_dc0FUyBpd0",
      "settled":false,
      "settlement_id":[

      ],
      "meta":{

      },
      "next_action":{
         "type":"redirect_url",
         "redirect_url":{
            "url":"https://developer-sandbox-ui-sit.flutterwave.cloud/redirects?card&token=eyJhbGciOiJIUzI1NiJ9.eyJjbGllbnRJZCI6ImNiYThhMTkwLTE2OGUtNGNmZS05NmY5LTE2NDZhYjFhOWNkYiIsImNoYXJnZUlkIjoiY2hnX21KbUc3NWZlMGIiLCJzdWIiOiJjYmE4YTE5MC0xNjhlLTRjZmUtOTZmOS0xNjQ2YWIxYTljZGIiLCJpYXQiOjE3Mzc5Njk2NjUsImV4cCI6MTczNzk2OTk2NX0.NUhI4QvF9EO9QQwDyrCqCcxvnGFtIu6j8tZxXZOoWxo"
         }
      },
      "payment_method_details":{
         "type":"applepay",
         "applepay":{
            "card_holder_name":"John Agba Doe"
         },
         "id":"pmd_0qIXBVx2xi",
         "meta":{

         },
         "created_datetime":"2025-01-27T09:18:38.564Z"
      },
      "reference":"ex61m673j6a3y0kk4o8ilrri",
      "status":"pending",
      "processor_response":{
         "type":"pending",
         "code":"02"
      },
      "created_datetime":"2025-01-27T09:21:05.307883378Z"
   }
}
Flutterwave will then send a webhook notification with the final transaction status once the payment is completed and funds are received.
Refer to the next section to learn how to verify the transaction.
Step 5: Verify the Payment
Before you provide value to the customer, confirm the transaction's final status and amount. You can verify the transaction information either using webhooks or by retrieving the charge details:
- Webhooks: It is important to have webhooks enabled on your Flutterwave dashboard. If you have webhooks enabled, we'll call your webhook URL with the payment details when the transaction is completed or fails. Below is a sample webhook payload:
{
  "webhook_id": "wbk_AlAGaWON8r2yvUVDxwzH",
  "timestamp": 1737707750980,
  "type": "charge.completed",
  "data": {
    "id": "chg_kqib0GlbgI",
    "amount": 250,
    "currency": "USD",
    "customer": {
      "id": "cus_IpH7CKCUtD",
      "address": null,
      "email": "[email protected]",
      "name": null,
      "phone": null,
      "meta": {},
      "created_datetime": "2024-11-30T15:27:03.179Z"
    },
    "description": null,
    "meta": {
      "person_name": "Abraham Olaobju",
      "role": "Developer"
    },
    "payment_method": {
      "type": "applepay",
      "applepay": {
        "card_holder_name": "Abraham Jesulayomi Olaobaju"
      },
      "id": "pmd_058VyomRI6",
      "customer_id": "cus_IpH7CKCUtD",
      "meta": {},
      "device_fingerprint": null,
      "client_ip": null,
      "created_datetime": "2025-01-24T06:26:24.855Z"
    },
    "redirect_url": "https://google.com",
    "reference": "664c14e1-eca3-4abc-b0d4-c7e9525edd4d",
    "status": "succeeded",
    "processor_response": {
      "type": "approved",
      "code": "00"
    },
    "created_datetime": "2025-01-24T08:35:29.051Z"
  }
}
- Retrieve the Charge: You can manually check the status of a charge by calling the retrieve a charge endpoint using the charge ID, which is returned in the
data.idfield of the response after successfully initiating a charge
curl --request GET \
--url 'https://developersandbox-api.flutterwave.com/charges/id' \
--header 'Authorization: Bearer <YOUR_ACCESS_TOKEN>' \
--header 'Content-Type: application/json' \
--header 'X-Trace-Id: <YOUR_UNIQUE_TRACE_ID>' \
--header 'X-Idempotency-Key: <YOUR_UNIQUE_INDEMPOTENCY_KEY>' \
You'll get a response similar to this:
{
   "status":"success",
   "message":"Charge fetched",
   "data":{
      "id":"chg_mJmG75fe0b",
      "amount":200,
      "fees":[
         {
            "type":"vat",
            "amount":0
         },
         {
            "type":"app",
            "amount":0
         },
         {
            "type":"merchant",
            "amount":0
         },
         {
            "type":"stamp_duty",
            "amount":0
         }
      ],
      "currency":"USD",
      "customer_id":"cus_dc0FUyBpd0",
      "settled":false,
      "settlement_id":[

      ],
      "meta":{

      },
      "next_action":{
         "type":"redirect_url",
         "redirect_url":{
            "url":"https://developer-sandbox-ui-sit.flutterwave.cloud/redirects?card&token=eyJhbGciOiJIUzI1NiJ9.eyJjbGllbnRJZCI6ImNiYThhMTkwLTE2OGUtNGNmZS05NmY5LTE2NDZhYjFhOWNkYiIsImNoYXJnZUlkIjoiY2hnX21KbUc3NWZlMGIiLCJzdWIiOiJjYmE4YTE5MC0xNjhlLTRjZmUtOTZmOS0xNjQ2YWIxYTljZGIiLCJpYXQiOjE3Mzc5Njk2NjUsImV4cCI6MTczNzk2OTk2NX0.NUhI4QvF9EO9QQwDyrCqCcxvnGFtIu6j8tZxXZOoWxo"
         }
      },
      "payment_method_details":{
         "type":"applepay",
         "applepay":{
            "card_holder_name":"John Agba Doe"
         },
         "id":"pmd_0qIXBVx2xi",
         "meta":{

         },
         "created_datetime":"2025-01-27T09:18:38.564Z"
      },
      "reference":"ex61m673j6a3y0kk4o8ilrri",
      "status":"pending",
      "processor_response":{
         "type":"pending",
         "code":"02"
      },
      "created_datetime":"2025-01-27T09:21:05.307Z"
   }
}
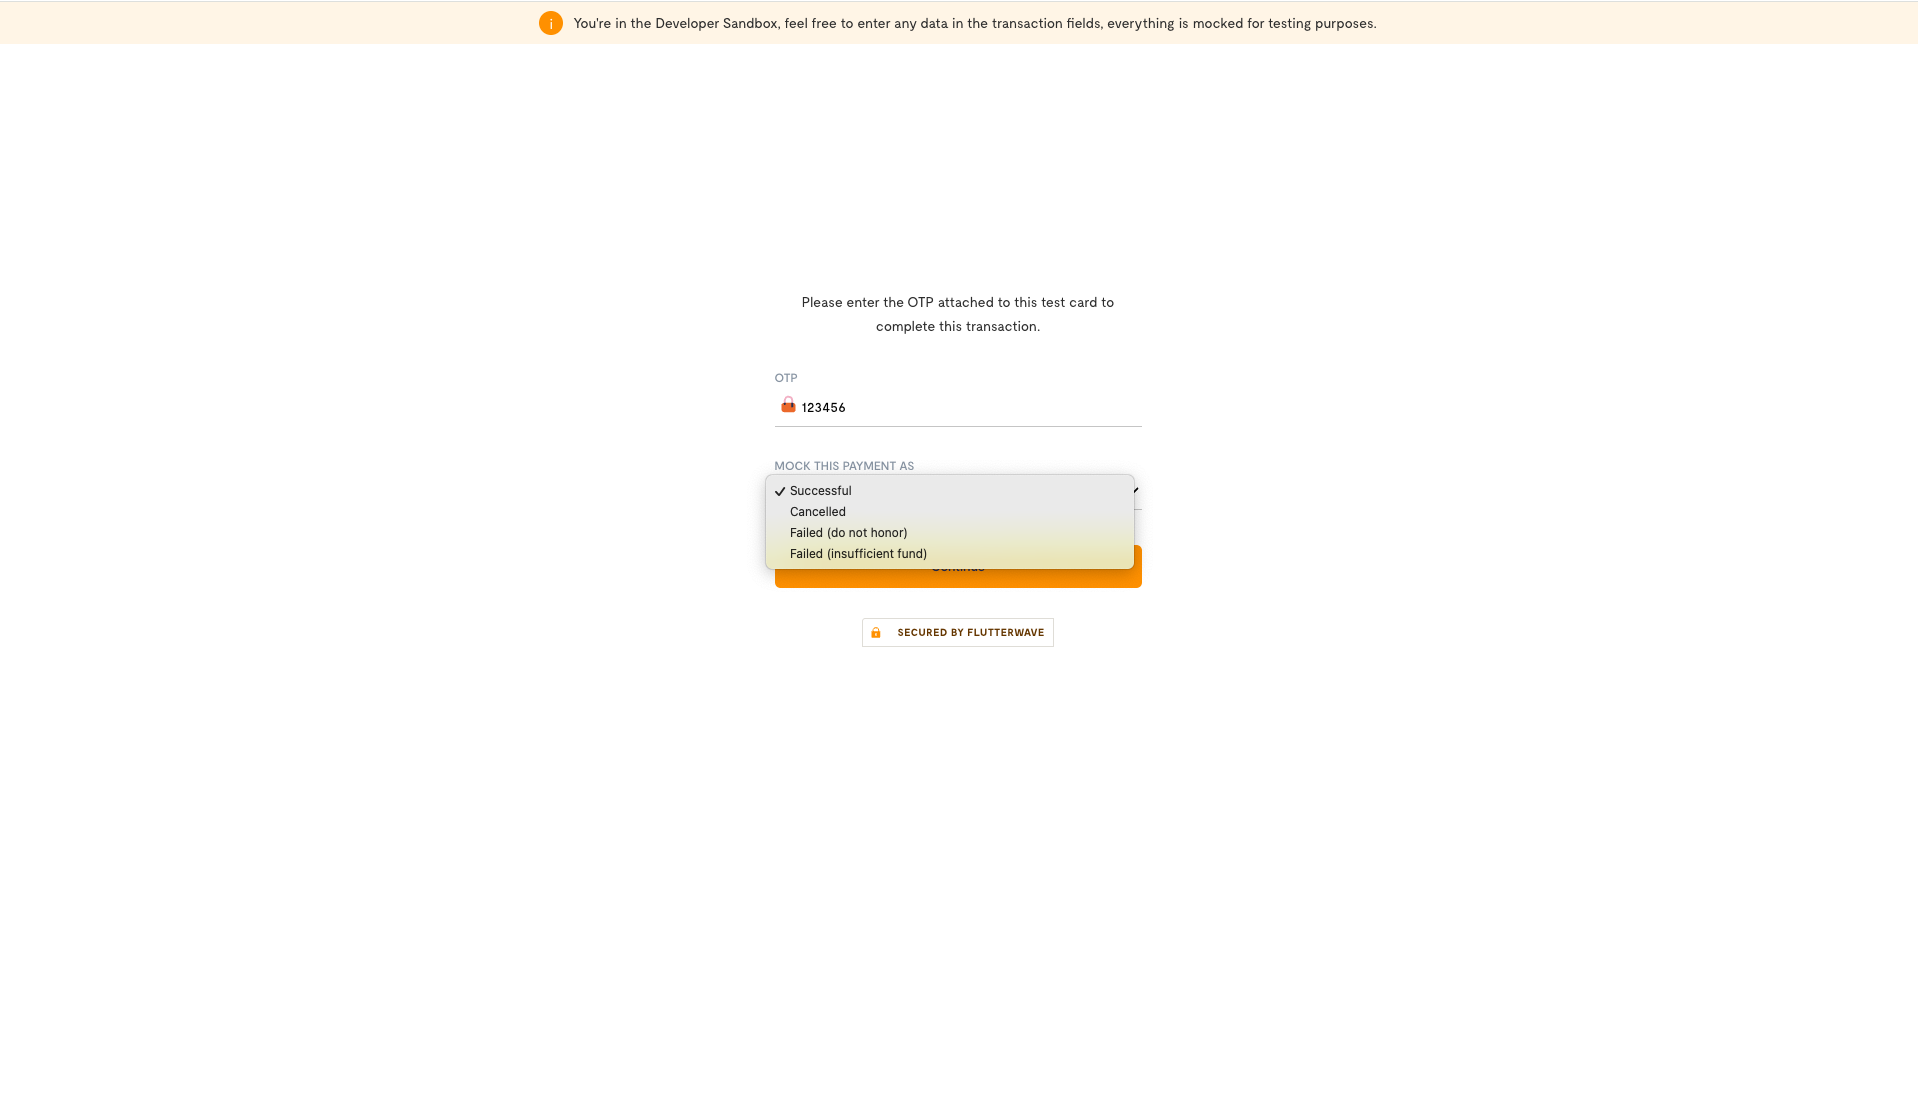
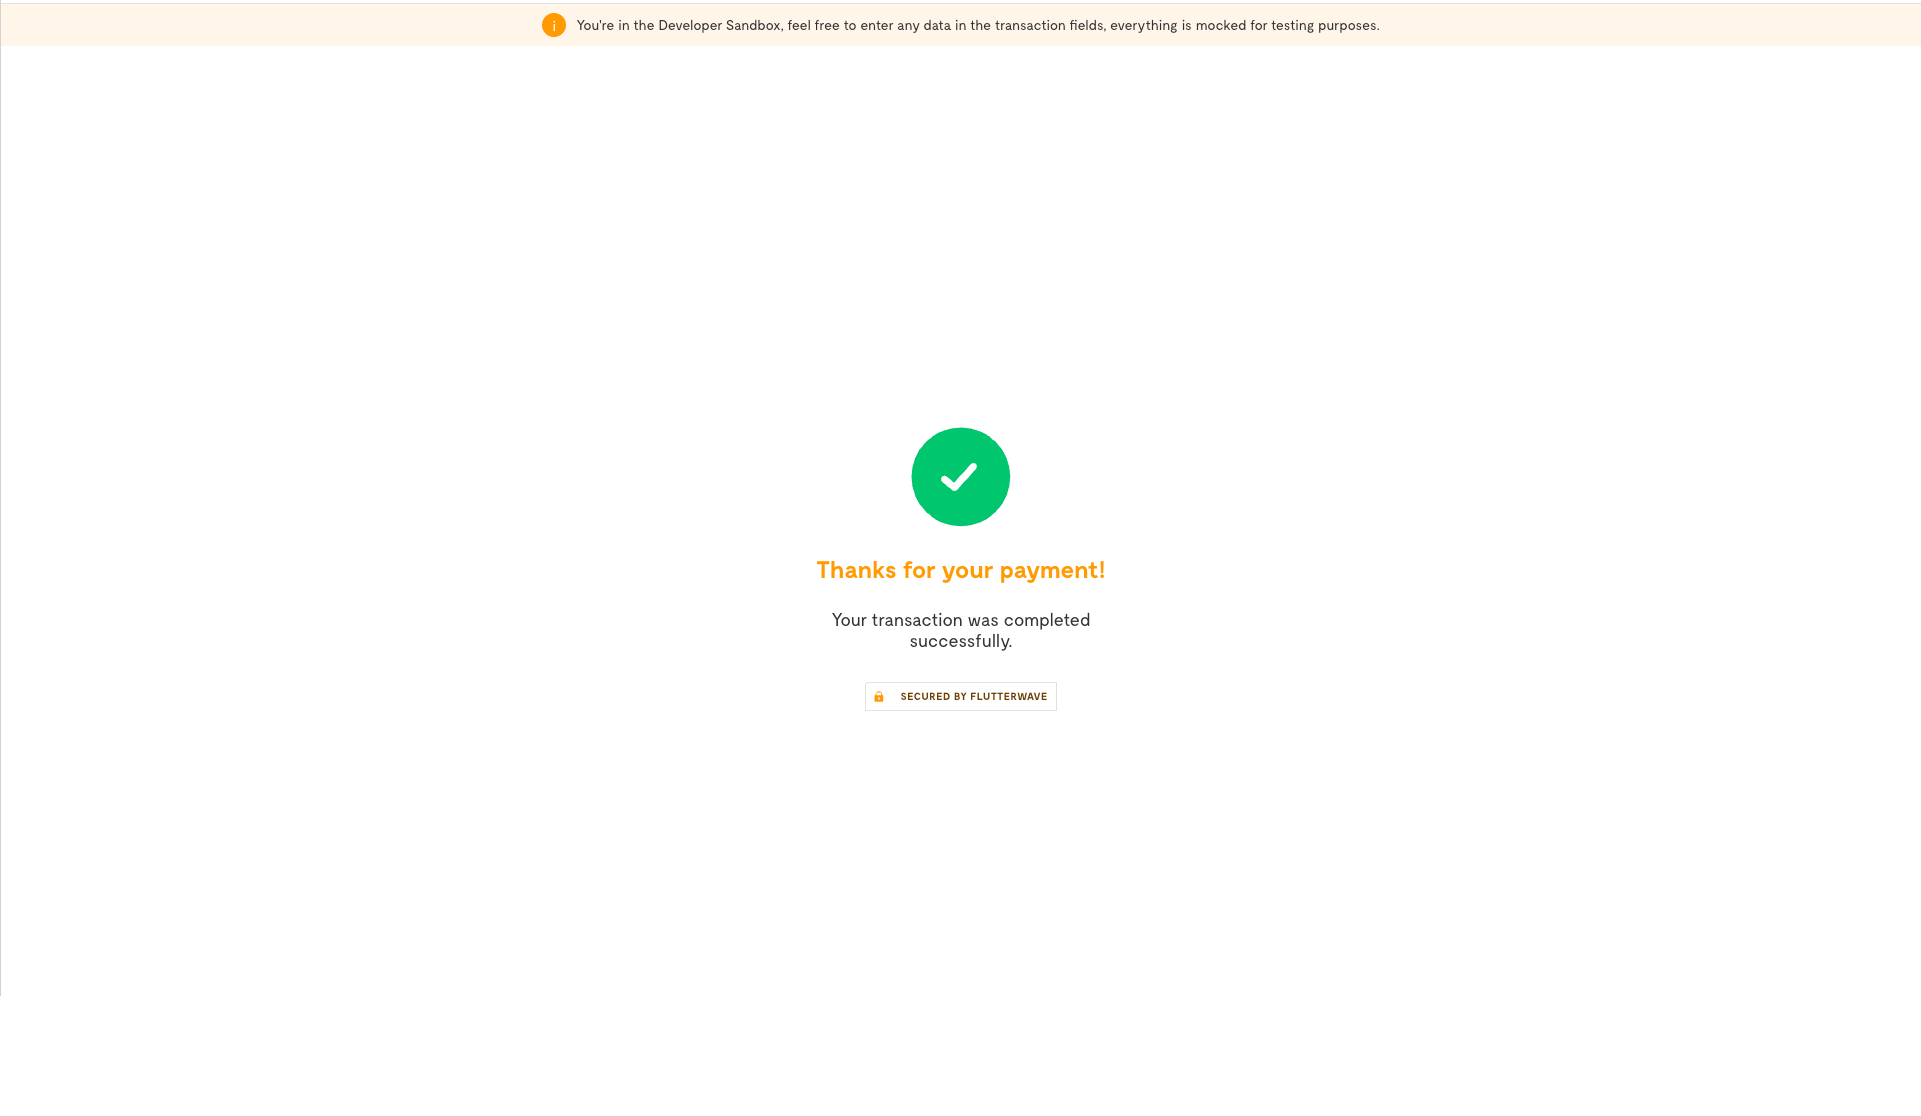
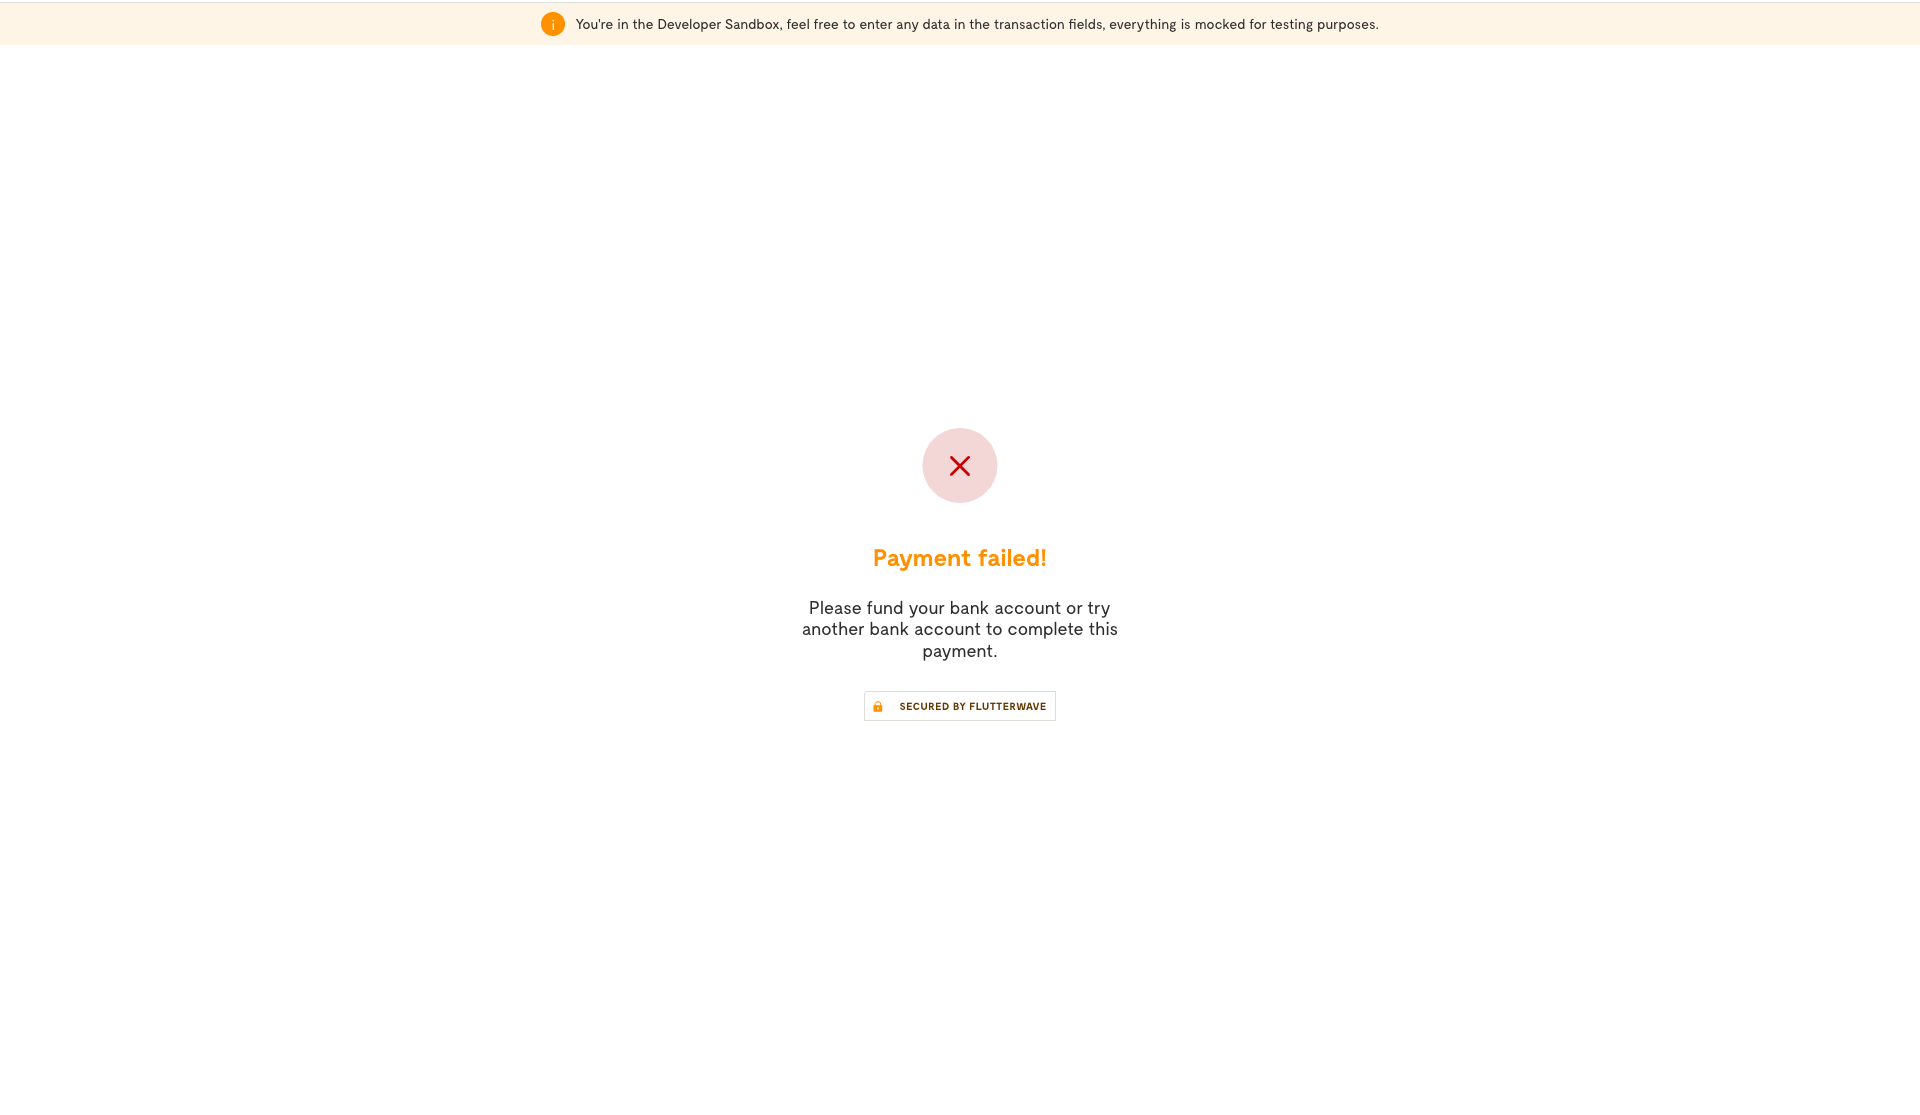
Testing your Integration
Testing your integration requires no extra configuration or special data. Initiate the Apple Pay charge, and we'll return a redirect link to our mock page, where you can simulate both successful and failed customer attempts.
Next Steps
That’s it! You’ve completed your integration with Apple Pay. It doesn't end there, there is more:
- Learn about settlements of successful payments into your Flutterwave balance.
- For cases where refunds are necessary, see the refunds guide for more information on how to process transaction refunds.
Updated 5 months ago