
Supported Countries
You can transfer money to the following countries with Flutterwave:
Nigeria, United States, The United Kingdom, SEPA, Ghana, Kenya, Uganda, Tanzania, South Africa, Cameroon, Ivory Coast, Sierra Leone, Senegal, Rwanda, and over 30 other Countries.
See our support docs for details.
What you can send
Send a payout from your available balance to one recipient, or to many recipients at once. The recipient can be a bank account, a mobile money wallet, or another Flutterwave account.
Read this page first, then follow the guide for the payout type you need:
Prerequisites
Before you start your integration:
- Verify your dashboard settings and enable Transfer via API.
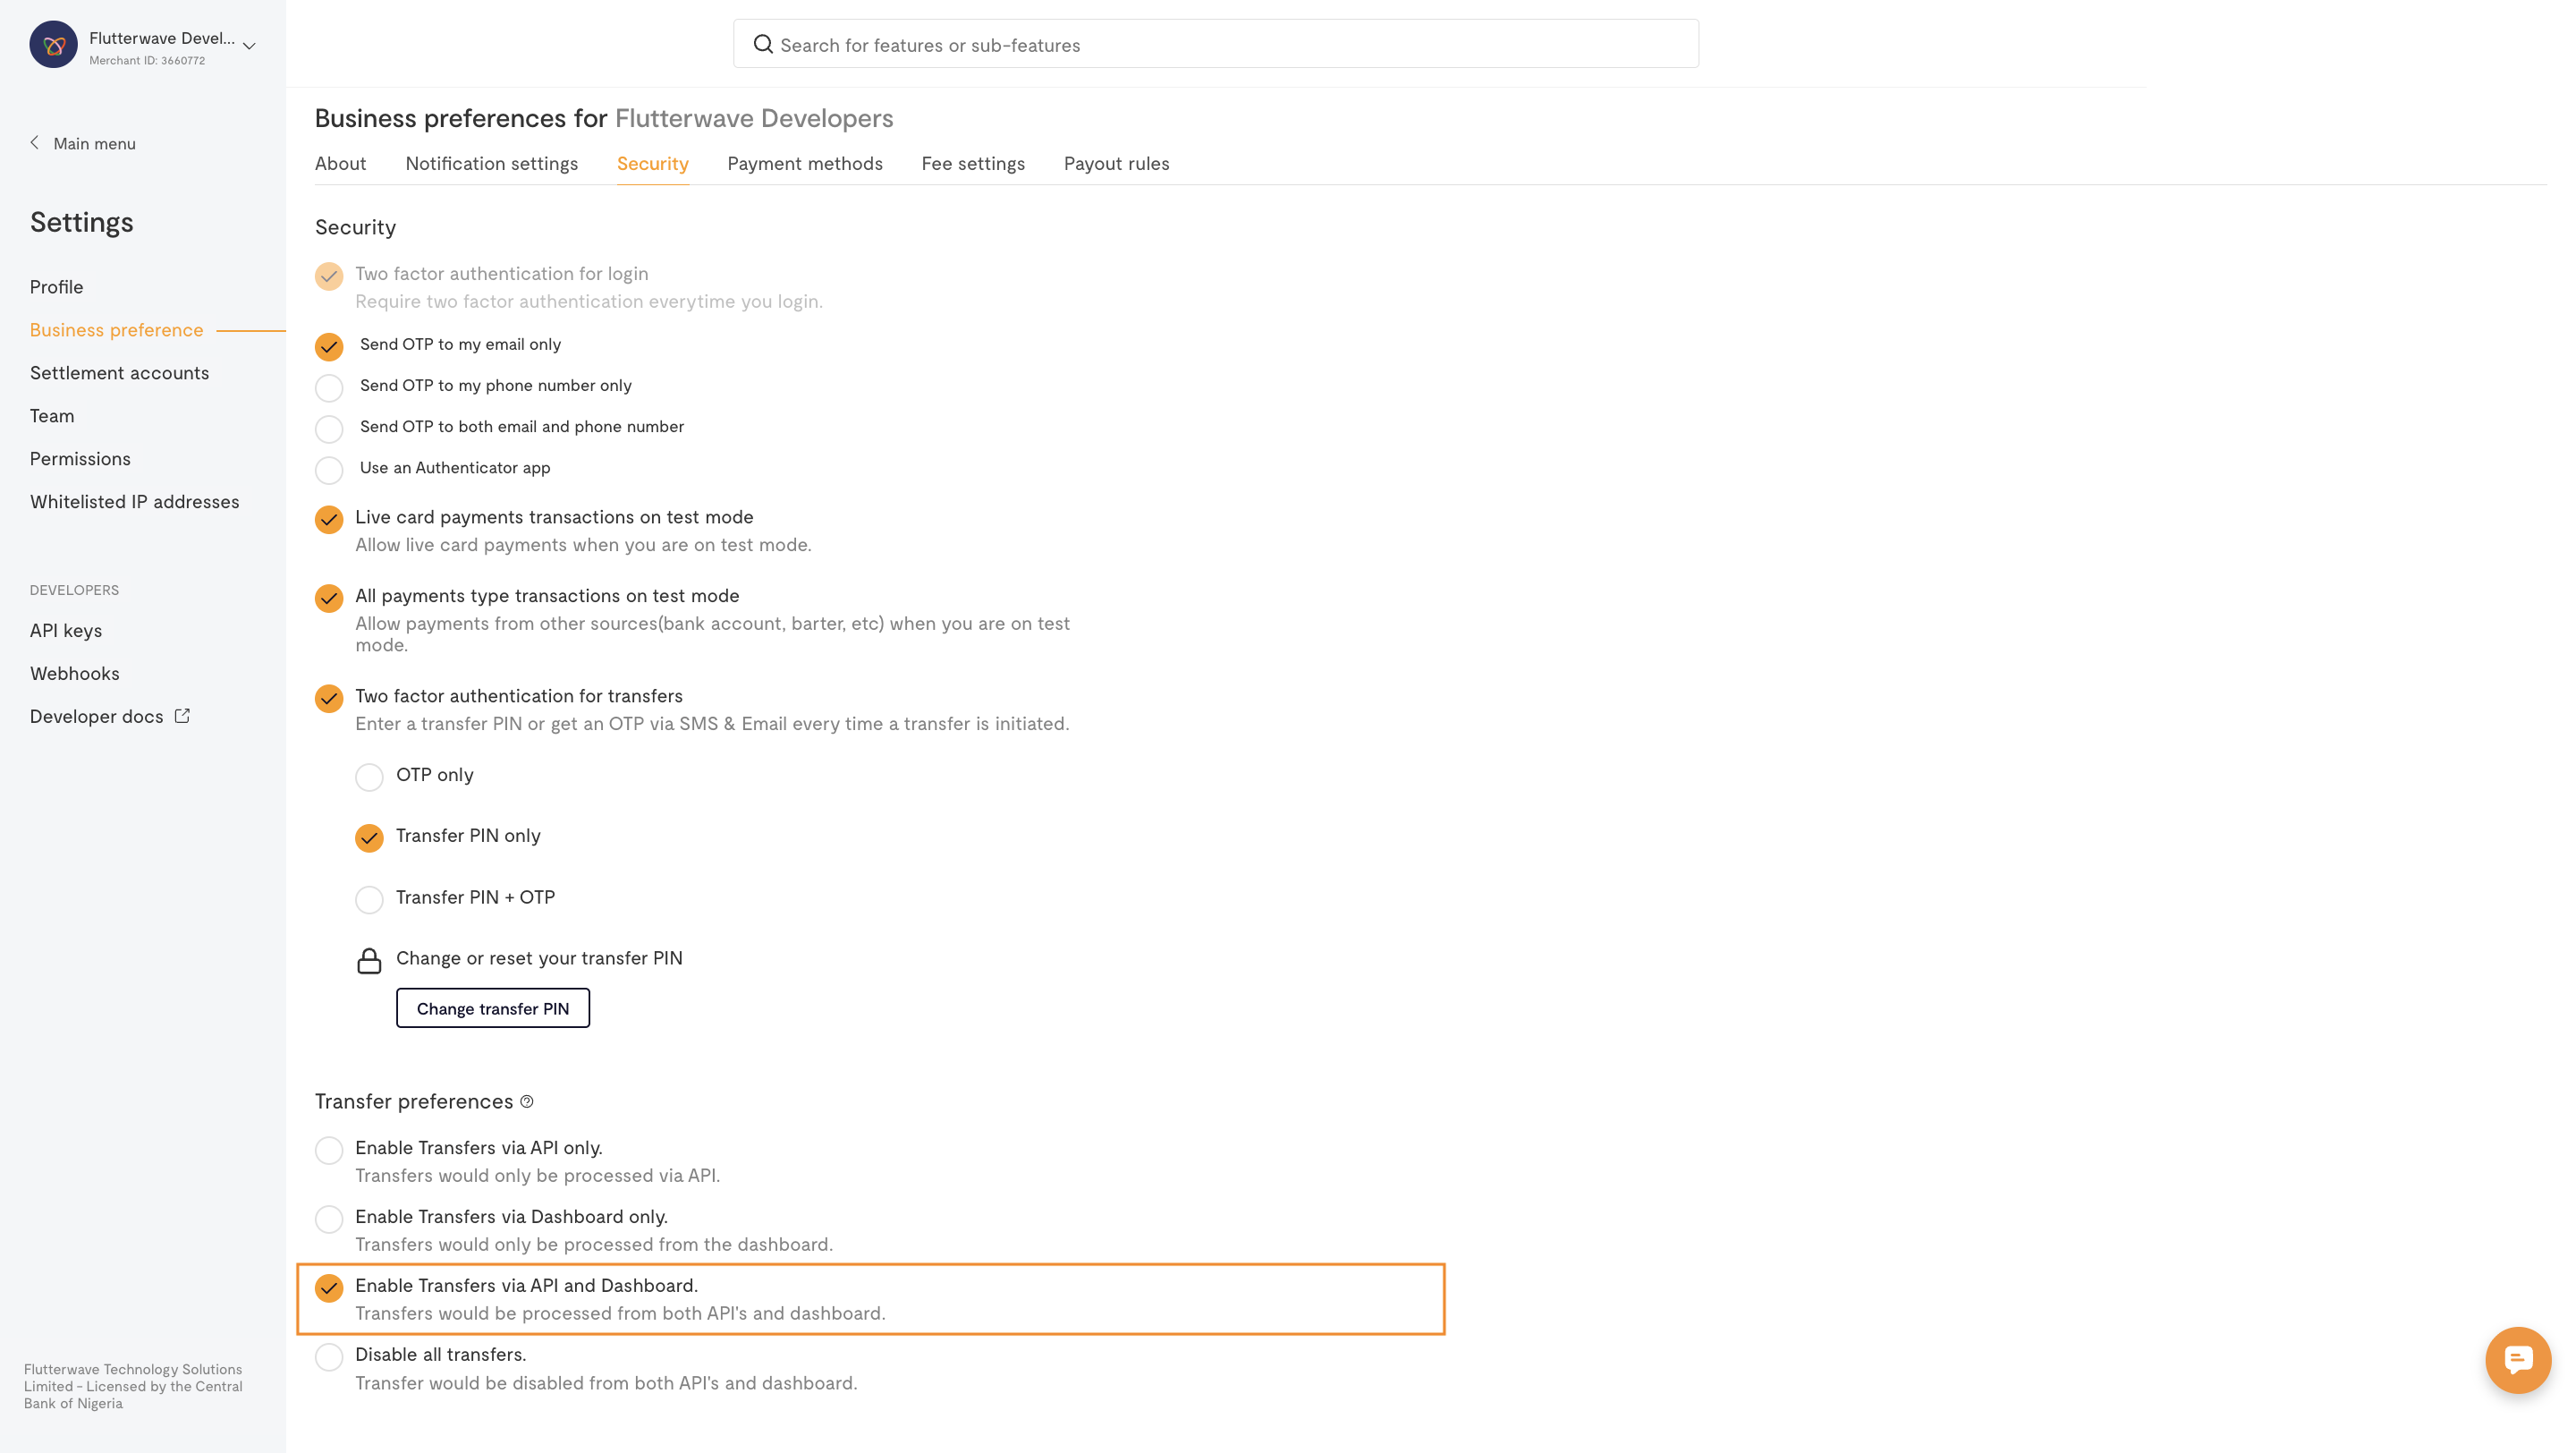
- Whitelist the IP addresses of the servers that will be making Transfer API calls.
How Transfers Work
You can make a transfer directly from your dashboard or by using the transfer APIs.
When making a transfer via API, you’ll send a POST request to the create transfer endpoint. The required fields vary depending on the type of transfer, but you’ll typically need to specify:
- amount: the amount to transfer
- currency: the currency of the transfer
- account_bank: the recipient’s bank code or identifier
- account_number: the recipient’s account number
You can also include optional fields such as:
- A narration describing the transfer,
- A unique reference code to identify the transfer (if you don't supply one, we'll generate one for you).
- A meta, for any extra information you want to record about the transfer, for example: "meta": {"quantity": "24", "goods_received_at": "24/02/21"}.
Javascript
// Install with: npm i flutterwave-node-v3

const Flutterwave = require('flutterwave-node-v3');
const flw = new Flutterwave(
	process.env.FLW_PUBLIC_KEY,
	process.env.FLW_SECRET_KEY
);
const details = {
	account_bank: '044',
	account_number: '1234567840',
	amount: 200,
	currency: 'NGN',
	narration: 'Payment for things',
	reference: generateTransactionReference(),
};
flw.Transfer.initiate(details).then(console.log).catch(console.log);
Cross-currency Transfers
By default, we'll debit your balance matching the transfer currency e.g. for a 200 GHS transfer, we'll debit your GHS balance. You can override this by using the debit_currency field.
Javascript
await flw.Transfer.initiate({
    account_bank: "044",
    account_number: "1234567840",
    amount: 200,
    currency: "GHS", // destination currency
    debit_currency: "NGN" // source or wallet to debit for the transfer.
});
You can use the transfer rates endpoint to get the current rate we'll use when converting between currencies.
Handling the Response
After creating a transfer, you'll get a response like this:
Javascript
{
	"status": "success",
	"message": "Transfer Queued Successfully",
	"data": {
		"id": 190626,
		"account_number": "1234567840",
		"bank_code": "044",
		"full_name": "Alexis Sanchez",
		"created_at": "2021-04-26T11:19:55.000Z",
		"currency": "NGN",
		"debit_currency": "NGN",
		"amount": 200,
		"fee": 10.75,
		"status": "NEW",
		"reference": "jh678b3kol1Z",
		"meta": null,
		"narration": "Payment for things",
		"complete_message": "",
		"requires_approval": 0,
		"is_approved": 1,
		"bank_name": "ACCESS BANK NIGERIA"
	}
}
There are some important details here:
data.id is the ID of the transfer. You can use this ID to fetch details about this transfer later.
data.status is the status of the transfer. data.complete_message is a friendly explanation of the status.
- For a new transfer, the status is "NEW". The complete_message is typically empty.
- A status of "PENDING" means that the transfer is being processed. The complete_message might be "Transaction is currently being processed".
- When the transfer is completed, the status changes to SUCCESSFUL. The complete_message might be "Transaction was successful".
- If the transfer fails, the status changes to FAILED. The complete_message would contain the failure reason, such as "Account resolve failed".
If a transfer fails, you can retry it with the retry transfer endpoint.
Checking the Status of the Transfer
There are three ways to find out the status of a transfer:
If you have webhooks enabled, we'll call your webhook URL with the transfer details when the transfer is completed or fails.
If you specified a callback_url when creating the transfer, we'll call that URL with the transfer details when the transfer is completed or fails.
Javascript
await flw.Transfer.initiate({
  account_bank: "044",
  account_number: "1234567840",
  amount: 200,
  currency: "NGN",
+ callback_url: 'http://my-callback-url'
})
- You can manually check the current status of the transfer by calling the get transfer endpoint with the transfer ID
Here's what the webhook/callback payload looks like:
Javascript
  {
  "event": "transfer.completed",
  "event.type": "Transfer",
  "data": {
    "id": 8416497,
    "account_number": "******",
    "bank_name": "ACCESS BANK NIGERIA",
    "bank_code": "044",
    "fullname": "John Doe",
    "created_at": "2021-04-28T17:01:41.000Z",
    "currency": "NGN",
    "debit_currency": "NGN",
    "amount": 100,
    "fee": 10.75,
    "status": "SUCCESSFUL",
    "reference": "TX-refe123456-6-3-1",
    "meta": null,
    "narration": "Test for wallet to wallet",
    "approver": null,
    "complete_message": "Transaction was successful",
    "requires_approval": 0,
    "is_approved": 1
  }
}
Here's how you can check using the get transfer endpoint:
Javascript
const response = await flw.Transfer.get_a_transfer({id: transferId});
Resending Failed Webhooks for Transfers
If a transfer fails after a retry, you can automatically resend webhooks for the failed transfers to the specified webhook URL or callback URL. This ensures that the transactional data is reliably delivered to its intended destination.
To resend a failed webhook for a transfer, pass the transfer ID to the resend transfer webhook endpoint.
Javascript
curl -X POST "https://api.flutterwave.com/v3/transfers/:id/resend-hook" \
  -H "Authorization: Bearer <YOUR_SECRET_KEY>"
You'll get a response that looks like this:
Javascript
{
    "status": "success",
    "message": "Hook sent successfully",
    "data": "hook sent"
}
Resent Webhook
Once the request is successful, we’ll send you a webhook like this:
Javascript
{
  "event": "transfer.completed",
  "event.type": "Transfer",
  "data": {
    "id": 708320,
    "account_number": "676064566",
    "bank_name": "FA-BANK",
    "bank_code": "FMM",
    "fullname": "Test User",
    "created_at": "2024-09-12T09:02:25.000Z",
    "currency": "NGN",
    "debit_currency": "NGN",
    "amount": 100,
    "fee": 45,
    "status": "FAILED",
    "reference": "5c80b93723fbf495",
    "meta": {
      "first_name": "Judith",
      "last_name": "Ifeoma",
      "email": "[email protected]",
      "mobile_number": "676064566",
      "recipient_address": "Immueble CiSo, Boulevard de la liberte, Akwa Douala"
    },
    "narration": "Test  transfer",
    "approver": null,
    "complete_message": "DISBURSE FAILED: Invalid admin user passed",
    "requires_approval": 0,
    "is_approved": 1
  }
}
Checking the Transfer Fee
After making a transfer, the fee you were charged is indicated in the fee field of the response. You can check how much you'll be charged before making the transfer by using the get transfer fee endpoint. You'll need to specify the amount, currency, and type of transfer (mobilemoney, barter, or account).
Flutterwave Merchants
Transfers to other Flutterwave merchants are free.
For example, if you wish to transfer 2700 EUR to a bank account, you'd make this request:
Javascript
const response = await flw.Transfer.fee({
  type: "account",
  amount: 2700,
  currency: "EUR",
});
You'll get a response like this:
Javascript
{
	"status": "success",
	"message": "Transfer fee fetched",
	"data": [
		{
			"currency": "EUR",
			"fee_type": "value",
			"fee": 35
		}
	]
}
This means you'll be charged 35 EUR for this transfer.
Beneficiaries
After making a transfer, the destination account details are saved as a new beneficiary. You can then use the beneficiary ID as a shortcut to make a transfer to the same account in the future, allowing you to skip specifying the account details.
Javascript
await flw.Transfer.initiate({
    beneficiary: 7758,
    amount: 200,
    currency: "NGN",
});
You can manage your saved beneficiaries with the API: you can add beneficiaries at any time, fetch one or all beneficiary details, and delete a beneficiary.
Verifying Account Details
You can fetch a destination account's details before making a transfer. While this isn't required, it can be helpful to confirm that the details were entered correctly and that the transfer is going to the intended recipient.
Verification is supported for Nigerian bank accounts and Flutterwave merchant IDs. See our guide to bank account verification for details.
Testing Transfers
IP Whitelisting
In order to conduct a successful integration test, it's important to ensure that you whitelist the IP addresses of the servers making the transfer API calls
You can find test credentials and mock data for your Integration tests in the testing helpers section.
Handling Errors
Transfer errors can happen for different reasons, which we can group into:
- Technical issues (response codes: 4XX and 5XX).
- Processing issues (response code: 200).
Technical Issues occur when there’s a problem with your API request. Common causes include incorrect formatting, missing API keys, authentication failures, or request timeouts.
Transfer failures caused by processing issues are slightly different. Although the response may return a 200 status code, the transaction fails due to reasons like insufficient funds or incorrect bank account details.
Javascript
{
   "status": "error",
   "message": "amount is required",
   "data": null
}
| Response Code | Possible Causes | Action |
|---|---|---|
| 400 | 1. Invalid request format 2. Some fields fail validation 3. Missing required fields. 4. Sending requests from non-whitelisted IPs | 1. Review the request body and fields. 2. Ensure your requests are made from whitelisted IPs. 3. Review the error message returned. |
| 401 | Wrong or missing API Keys. | Confirm the value of API Keys in your request. |
| 404 | Incorrect/Invalid Transfer IDs. | Confirm transfer IDs. |
| 503 | The server is temporarily unable to process requests. | 1. Query the transfer status filtering with the reference and transfer date. 2. If there is no record (empty object) from step 1, reinitiate the transfer. 3. Wait and retry later. |
Next Steps
Before you go live with your integration, be sure to check out our Integration Guide for extra guidelines. If you ever find yourself stuck, don't hesitate to reach out to our dedicated support team for assistance.