

Introduction
Use the bill payment APIs to pay airtime, cable, data, utilities, and similar bills from your Flutterwave balance.
Only Nigerian Billers
Bill payment APIs currently support Nigerian billers only. Contact support if you need another country.
Prerequisites
- Complete your profile and KYC.
- Fund your source balance, which is the balance to be debited for bill payment. You can do this by
- Direct funding your balance.
- Indirect funding it by moving funds from a different balance to your source balance. Refer to the list of supported currencies for intra-wallet transfers.
- Whitelist the IP addresses of the servers that will call the API.
Supported Bill Types
Flutterwave supports payments for different bills, including Airtime, Data Subscriptions, Cable Payments, Internet Subscriptions e.g. IPNX, Utility Bills, and Tax Payments.
To see every supported category, call Get supported bill categories.
Pay a bill
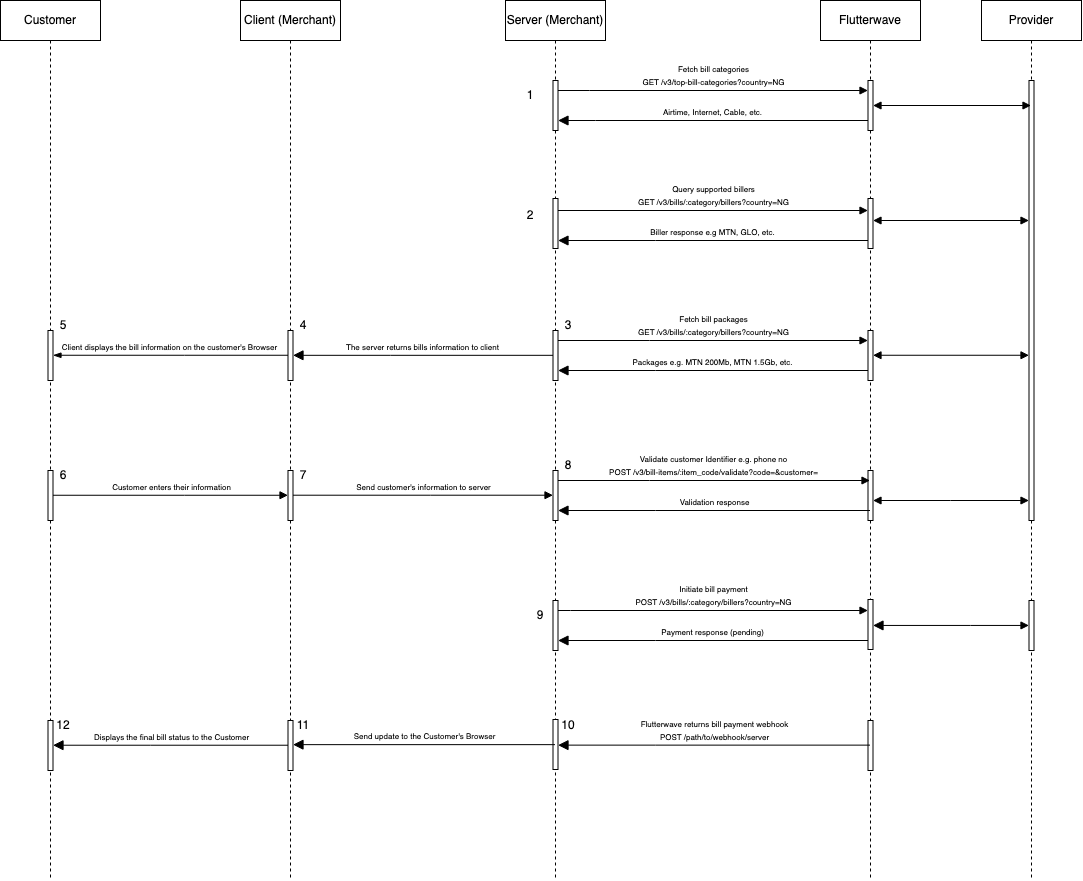
To pay a bill:
- Fetch the bill information to display to your customers.
- Collect and validate customer information.
- Initiate the bill payment request.
- Verify the payment status.
Look up the bill
Understanding the different types of bills is important for helping your customers select the correct one to pay. This process involves three steps:
- First, call the high-level category API. This returns the supported categories for the country.
- With the category code, query the billers API, which returns billers for the selected category and country sent in the request.
- Finally, fetch the bill items (packages) by calling the bill item endpoint.
Each step returns important information for you to display to your customers.
Fetch Category Sample Response
Javascript
{
    "status": "success",
    "message": "Categories fetched successfully",
    "data": [
        {
            "id": 1,
            "name": "Airtime",
            "code": "AIRTIME",
            "description": "Airtime",
            "country_code": "NG"
        },
        {
            "id": 2,
            "name": "Mobile Data Service",
            "code": "MOBILEDATA",
            "description": "Mobile Data Service",
            "country_code": "NG"
        },
        {
            "id": 3,
            "name": "Cable Bill Payment",
            "code": "CABLEBILLS",
            "description": "Cable Bill Payment",
            "country_code": "NG"
        },
        {
            "id": 4,
            "name": "Internet Service",
            "code": "INTSERVICE",
            "description": "Internet Service",
            "country_code": "NG"
        },
        {
            "id": 5,
            "name": "Utility Bills",
            "code": "UTILITYBILLS",
            "description": "Utility Bills",
            "country_code": "NG"
        },
        {
            "id": 6,
            "name": "Tax Payment",
            "code": "TAX",
            "description": "Tax Payment",
            "country_code": "NG"
        },
        {
            "id": 7,
            "name": "Donations",
            "code": "DONATIONS",
            "description": "Donations",
            "country_code": "NG"
        },
        {
            "id": 8,
            "name": "Transport and Logistics",
            "code": "TRANSLOG",
            "description": "Transport and Logistics",
            "country_code": "NG"
        },
        {
            "id": 9,
            "name": "Dealer Payments",
            "code": "DEALPAY",
            "description": "Dealer Payments",
            "country_code": "NG"
        },
        {
            "id": 17,
            "name": "Religious Institutions",
            "code": "RELINST",
            "description": "Religious Institutions",
            "country_code": "NG"
        },
        {
            "id": 18,
            "name": "Schools & Professional Bodies",
            "code": "SCHPB",
            "description": "Schools & Professional Bodies",
            "country_code": "NG"
        }
    ]
}
Collect and validate the customer's details
Integration Tip
No validation is required for airtime and data bills.
After selecting the correct bill to pay for, the customer needs to send their information. We call this the customer parameter, which is an identifier for the customer making the payment:
- For airtime and mobile data bundles, the identifier is the customer's phone number.
- For Wi-Fi Internet bundles, the identifier is the customer's account number on that service.
- For electricity bills, the identifier is the customer's meter number.
- For cable subscriptions, the identifier is the customer's decoder or smart card number.
You don't need to hardcode the identifier field in your code. As shown in the examples (from step 1), the get bills endpoint returns a label_name field that contains a description of the identifier. Simply display this label next to a text box for your customer to enter their information.
Before proceeding with the payment, it's highly recommended to validate the information provided by your customer. To do this quickly, pass the customer identifier and the item_code into the validate bill API.
Javascript
{
	"status": "success",
	"message": "Item validated successfully",
	"data": {
		"response_code": "00",
		"address": null,
		"response_message": "Successful",
		"name": "Test DSTV Account",
		"biller_code": "BIL119",
		"customer": "0025401100",
		"product_code": "CB141",
		"email": null,
		"fee": 0,
		"maximum": 0,
		"minimum": 0
	}
}
Create the bill payment
On successful validation, Send the customer and biller create bill endpoint to initiate the payment. The important requirements for this request include:
- country: The customer's country. It should match the value specified in the get category request.
- customer_id: The customer identifier validated in step 2.
- amount: The amount to be paid for the bill. This must match data.amount returned from the get-bills endpoint.
It's important to also pass a custom reference in your request for easy tracking.
Javascript
{
    "country": "NG",
    "customer_id": "45076454185",
    "reference": "b1989abb-4167-41ce-b855-67377db12acd" //optional parameter,
    "amount": 200,
    "callback_url":"https://webhook.site/a2cd20ad-42d5-46f6-8e66-9ef07cbc121f" //optional parameter.
}
Response should look like this:
Javascript
{
	"status": "success",
	"message": "Bill payment successful",
	"data": {
		"phone_number": "+2347065657658",
		"amount": 11,
		"network": "MTN",
		"code": "200",
		"tx_ref": "CF-FLYAPI-20240308035516465263",
		"reference": "BPUSSD1709913319189093",
		"batch_reference": null,
		"recharge_token": null,
		"fee": 0
	}
}
In the response, we will first return the pending status. Once the payments have been processed successfully, we will notify you via webhooks.
Check the payment status
We provide two seamless ways to query a payment's status. You can poll the get status endpoint or receive webhooks for the payment. Using the get status endpoint, you should get a response like this:
Javascript
{
	"status": "success",
	"message": "Bill status fetch successful",
	"data": {
		"currency": "NGN",
		"customer_id": "07065657658",
		"frequency": "One Time",
		"amount": "11.0000",
		"fee": 0,
		"product": "AIRTIME",
		"product_name": null,
		"commission": 0,
		"transaction_date": "2024-03-08T15:55:16.963Z",
		"customer_reference": "d7a004b1-a581-4cd9-89ae-a1ff89c45c9a",
		"country": "NG",
		"flw_ref": "BPUSSD1709913319189093",
		"tx_ref": "CF-FLYAPI-20240308035516465263",
		"batch_id": 3387836,
		"extra": null,
		"product_details": "FLY-API-NG-AIRTIME"
	}
}
If you choose to use webhooks to update your transaction's status, you should read the webhook section to make sure you set up your webhook servers properly to get notifications from us.
Prepaid and Postpaid Utilities
Flutterwave simplifies electricity bill payments. We support both prepaid and postpaid electricity:
- Prepaid electricity ("Pay As You Use") – Requires purchasing and loading meter tokens before use. This helps with budgeting and prevents unexpected charges.
- Postpaid electricity – Allows usage first, with payment billed afterward, typically at the end of the billing cycle.
Flutterwave supports payments for the following electricity utility companies:
| Utility Company | Meaning | System | biller_code |
|---|---|---|---|
| EKEDC | Eko Disco Electricity Bills | Prepaid and Postpaid | BIL112 |
| IKEDC | Ikeja Disco Electricity Bills | Prepaid and Postpaid | BIL113 |
| IBEDC | Ibadan Disco Electricity Bills | Prepaid and Postpaid | BIL114 |
| EEDC | Enugu Disco Electricity Bills | Prepaid and Postpaid | BIL115 |
| PHED | Port Harcourt Disco Electricity Bills | Postpaid | BIL116 |
| BEDC | Benin Disco Electricity Bills | Prepaid and Postpaid | BIL117 |
| YEDC | Yola Disco Electricity Bills | Postpaid | BIL118 |
| KEDC | Kaduna Disco Electricity Bills | Prepaid and Postpaid | BIL119 |
| KEDCO | Kano Disco Electricity Bills | Prepaid and Postpaid | BIL120 |
| AEDC | Abuja Disco Electricity Bills | Prepaid and Postpaid | BIL204 |
Prepaid bills
- Step 1: Display the supported electrical utilities to customers. Based on the selected electrical utility, call our bill information endpoint using the biller_code provided above.
- Step 2: Collect and validate the customer’s meter number using our endpoint. More information is in Collect and validate the customer's details.
- Step 3: Initiate the bill payment using the item_code and biller_code. For the request itself, see Create the bill payment.
- Step 4: Finally, call our bill status endpoint or set up webhooks to obtain the customers token. The token will be returned in the “extra” field.
Javascript
{
   "status":"success",
   "message":"Bill status fetch successful",
   "data":{
      "currency":"NGN",
      "customer_id":"45702025995",
      "frequency":"One Time",
      "amount":"24900.00",
      "fee":100,
      "product":"EKEDC PREPAID TOPUP",
      "product_name":"EKEDC PREPAID TOPUP",
      "commission":30,
      "transaction_date":"2024-06-01T08:14:30.04Z",
      "customer_reference":"xxxxxxxx-xxxxxx-e4addd34-ad0d-4480-9692-0d3f4faf8af8",
      "country":"NG",
      "flw_ref":"BP17172296728964280563",
      "tx_ref":"CF-FLYAPI-20240601081430041391274",
      "batch_id":315361039,
      "extra":"TOKEN1147XXXX5707123",
      "product_details":"FLY-API-NG-EKEDC PREPAID TOPUP"
   }
}
In rare cases where the “extra” field returns no value or is returned as null, please contact us with the CF-FLYAPI reference or send us an email at <[email protected].> This is returned as the tx_ref from your bill initiation. e.g. "tx_ref": "CF-FLYAPI-20240308035516465263".
Postpaid bills
This process is similar to the prepaid flow; however, the key difference is that the status endpoint does not return tokens. Instead, the customer's postpaid meter is directly credited.
When you call the initiate bill payment endpoint, the meter should be credited with the specified amount.
If the status returns as pending, you can do any of the following:
- Set up webhooks to receive real-time status updates automatically (Recommended).
- Poll the status endpoint to check for updates.
Review past bill payments
Retrieve your payment logs using the transaction history APIs. We provide two different views for historical transactions:
- Bill summary: This API reports the summary view of all the bill payments made in a period.
- Bill histories: This API returns the transaction log of all bill payments made.
Combining both views gives you a 360-degree view of all the payments made on your account.
Test a DSTV payment
- Collect and validate your customer's information. The required fields are in Collect and validate the customer's details.
- To validate on test mode, use the DSTV credential.
- Add the credential to your request payload.
- Send the request to the create bill payment endpoint.
- Check your webhook server for the successful bill payment.
- Verify the status using the status endpoint.